So here is my very first tutorial and I hope it helps the rest of you non-gadget having crafters like myself.
Numero uno, gather the tools you will need for this project. Your yarn, a pair of scissors and your hands.
Start by cutting a piece of yarn six inches long. Set this aside for now.

Hold the yarn securely against your index finger with your thumb. I use my dominant hand as the wrap-pee (it’s a word!) and my left hand as the wrapper. You can try it either way and just switch if one way doesn’t work for you.
Start to wrap the yarn down your hand and back around your fingers. Don’t do this too tight or else you won’t be able to get your fingers out! Been there, done that!
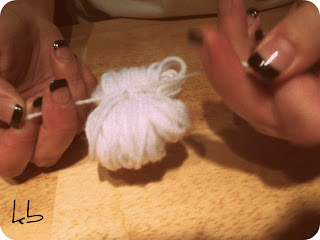
For this tutorial, which yielded a pom pom about 1 inch in diameter, use three fingers as in the pictures.
To make a larger pom pom you can use your palm or your fingers leaving space in between them when wrapping.

Continue wrapping yarn the yarn until you have a pretty good amount of yarn built up. The more yarn you use the fuller or fluffier it will be

I probably did somewhere between 50-65 passes, or 10 Mississippi’s ( 1 Mississippi, 2 Mississippi, etc.) making this pom pom
Here is where things can differ. My yarn sort of stuck together in a clump after I pulled it off my fingers, so I was able to lay it down on the extra piece that was cut at the beginning. If your yarn doesn’t cooperate then you can feed the cut piece under your bunch of yarn and tie it before taking it off.

Tie the extra piece TIGHTLY around the center of your yarn.
Flip over and tie again. Make sure it’s good and secure.

Hold your yarn poof by the tail you have just created.

Slide your scissors inside the loops on either side of the tied center section and begin to cut the loops open.

Do this on both sides.


You will end up with a crazy spidery mop type thing.

Keep holding the tail and start to trim the ends. I highly recommend doing this over a trash can or a file folder so that you funnel all that fuzz into the trash later.


As you trim you will notice that your “pom pom to be” will start to look fuller and more like an actual pom pom.


After a pretty decent hair cut you will end up with a pom pom made by your own tow hands! You can use the tail to help you attach the pom pom or cut it off flush with the rest of the yarn. Viola!

Feel free to contact me with any questions or suggestions. Feedback is always appreciated!
xox
Me